
Many years ago, when pictures of the Mandelbrot Set started to appear in Scientific American and other magazines, I burned to be able to make pictures of it on my own.
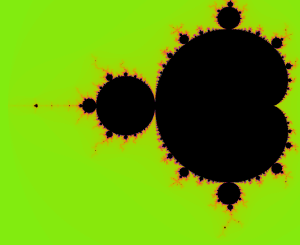
My first tries were made on a Vax 780, programmed in Vax Fortran and printed on a matrix printer, with letters representing the pixels: a blank ‘ ‘ for a point outside the set, an ‘x’ for a point inside. Needless to say, this made for very crude pictures.
The PC was still not everywhere, and absolutely not with any decent form of graphical output, and very expensive. Graphical programs were run on very special and expensive computers, which certainly were not available for programming (for fun). My department at work was a CAD department for PCBs for electronics (ECAD), using the computers in two shifts, 16 hours a day. As luck would have it, we were planning to upgrade to new software running on new, advanced hardware that would have to be tested in all ways possible. And that was my job! (A glimpse of what was happening at that time can be found here.)
The supplier of the new ECAD system had first chosen graphic workstations from Apollo Computers, which where the most advanced at that time. For many reasons, one of them being that the CPU of choice, the Motorola 68030, wasn’t available yet, they switched to a DEC platform, the MicroVax based VaxStation, which also had its own graphics processing unit. I actually programmed a Mandelbrot Set display program for both platforms, the porting from Apollo to VaxStation was fairly straightforward. I still have the code. This happened around 1986-87.
The graphics hardware and corresponding software libraries were actually quite advanced, making it easy for the programmer to keep the display alive and at the same time handle user input.
So going on to work on IBM (and compatible) PCs was really a step down. Doing bitmap graphics on an IBM/Microsoft DOS PC was a pain: I had to draw every single pixel directly to video memory, the resolution was low and the color palette down to 16 entries of very boring colors. The best one could hope for was 640×480 pixels and a 256 entry pallette with 8 bit for each color, i.e. only 256 different colors at the same time.
But the worst part was that the program could either calculate and draw, or execute user commands, as DOS is a single threaded system. If you interrupted the calculation, your picture would disappear, as it only existed in the display memory. And it took forever to calculate an interesting Mandelbrot Set section, as floating point calculations were really slow.
The introduction of Windows (I have been programming Windows programs since 1989, on version 2.11) didn’t do much to alleviate those problems. Windows was running on top of DOS and was also single threaded. Yielding to execute user input was complicated and didn’t work very well, and if you were unlucky, you had to recalculate and redraw parts of your display, as the content of the screen was essentially in video memory, as the amount of RAM your program could work with was limited by the CPU architecture (segments of up to 64 kiB). This in stark contrast to the big linear address space of the above mentioned workstations with several MiB of memory available to the program(mer).
Multilthreading and a flat address space came with Windows 95 and Windows NT 3.1, and slowly floating point calculations and CPU clock rates got faster, but even if I had my own PC from about 1992 (a 33 MHz 486, faster than my work PC), I didn’t get around to do my own Mandelbrot programs, or other bitmap based fun programming for many years.
Also happening in all those years is the appearance of the graphics cards with GPUs which can off load the CPU of a lot of processing related to showing graphic content. I didn’t need those capabilities for my job and didn’t have any free time for that purpose – you know, a house, children, a garden, etc.
But eventually the time came where I could focus again on programming for fun (the children have grown up, the house is OK, and I retired from the job market!)
Now PCs have become so fast and the graphic cards so powerfull that really complicated 3D games can be played on a PC at incredible frame rates and fast user interaction.
To help programmers make games, they can use software libraries and frameworks that can make graphics and other game elements happen on the screen, in the head phones and on the PC. A widely used framework is Microsoft’s DirectX that has a lot of game support included, but runs only on Windows based platforms. A widely used, cross platform library is OpenGL, which has a lower abstraction level and less (or no) direct game support, but is portable between different platforms like Linux, Windows, Android, Web Browsers and to a certain degree MacOS. An even lower abstraction level is provided by Vulcan.
But all I wanted to do was simple 2D pixel graphics. I wanted something cross platform, so I dropped investigating Direct2D. OpenGL seemed a possibility, so I looked around and found several libraries and frameworks that supports and uses that. My first try was with SFML which is a C++ object oriented thin wrapping of the concepts of OpenGL, and it seemed possible that I could do what I wanted with that. I was much inspired by examples I found on YouTube, e.g. https://www.youtube.com/watch?v=Z_zmZ23grXE on the channel CodeParade, run by HackerPoet. This is a mathematical model simulation for particles and their interactions, and the rules are parameterized to allow for different kinds of imaginary physical worlds.
For a project I wanted to make an investigative framework for cellular automata, of which Conway’s Game of Life is one example. The app was supposed to allow me to investigate different rule sets for transitions to the next time step, a desire that originates all the way back to an article I read in Dewdney’s column Computer Recreations in Scientific American December 1986. I also wanted to use some of the subtle fading techniques that are built into OpenGL and supported by the computer graphics adapter on the PC, inspired by some of HackerPoet’s projects, especially this one https://www.youtube.com/watch?v=fDSIRXmnVvk.
You can investigate my tries in my github repository https://github.com/frankbj57/SFMLBitmaps which is work currently abandoned for the following reasons.
SFML is a great library but you have to add a few bits yourself to make a working application:
- it has to be installed on your computer,
- you have to point your compiler to its header files and libraries,
- to support writing text you have to deal with font resource files,
- you have to set up an engine or a framework for your application to run,
- and to have the simple bitmap for simple graphics I was searching for, you actually have to implement such a bitmap yourself, as OpenGL is more oriented towards polygon and vector graphics than towards pixel by pixel manipulation.
You can see my class Bitmap in the above mentioned repository in the Bitmap.h+cpp files. It uses the OpenGL concepts Image, Texture and Sprite, which illustrates the bias of OpenGL. The actual pixels exist on the other side of the CPU-GPU interface, which makes it so complicated. I needed something else.
I cannot remember the exact path that took me to OneLoneCoder and his Pixel Game Engine – PGE. But this video https://www.youtube.com/watch?v=PBvLs88hvJ8 caught my attention because it combines Mandelbrot fractal generation, a pixel drawing surface, and parallel processing (which is also part of my interests, as seen in my first blogs on this site).
It was a great revelation and a moment of serendipity that the Pixel Game Engine – PGE – doesn’t need an installation procedure and it is very easy to integrate it in your C++ program.
Just copy one header file olcPixelGameEngine.h to your project folder. Using Visual Studio it is possible to make it visible under the Header files in your Solution Explorer, but as long as it is in the same folder as your main code file, it can be found by the compiler. All code is in that header file and only standard libraries either already included in your build environment, or easily installed, are needed.
The paradigm for the Game Engine framework is, as stated, a game paradigm. Instead of having to keep tabs of the content of your main window at all times, it is redrawn completely many times every second as frames. This comes natural for games, they need to show real time dynamic action on the screen, but is less natural for the usage I was considering, drawing on a bitmap.
But modern days computers are so fast that graphics can be generated many times every second, even for complicated fractal images, so that wasn’t a problem, I just had to get used to it.
For real games, the graphics adapter can support redrawing complicated scenes with many elements, so it is not quite that simple. But for my simple bitmaps, it works without having to know about OpenGL and other gaming graphics. PGE gives me the things I need to have fun!
The gaming paradigm looks like this in a flow diagram:
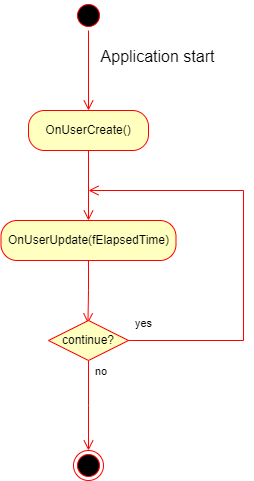
The scene for your application is set up in the initial step, and then the screen will be updated in a loop running as fast as possible for as long as you want the application to continue, each iteration generating a new frame. PGE has reduced your job to just those two steps, encapsulated in the methods OnUserCreate and OnUserUpdate.
This is done by PGE providing a base class, which you then inherit from:
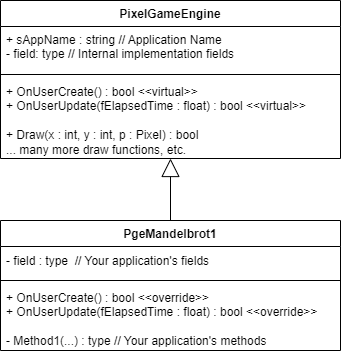
All the essential drawing methods are part of the base class as public, so they are available for your code in the two methods you have to program.
Here is a pseudo code description of what OnUserUpdate could do:
OnUserUpdate(fElapsedTime)
    Poll for and react to user input from keyboard or mouse
    Update your world according to user input
    And/Or
    Update your world according to the elapsed time since last frame
    Draw the desired contents from your world to the screen
If OnUserUpdate returns the value false, the frame loop will stop and the application will stop.
The code shown in the following paragraphs can be seen in my github repository, as the PgeMandelbrot1 project in the Visual Studio solution found here: https://github.com/excursionswithcpp/PgeIterativeProjects.
When I speak about the “world” it is the 2 or 3 dimensional virtual space your game or your objects exist in. This may not be limited to what is shown on the screen, so some sort of delimitation must be set up, for what ends up on the actual screen, often called a viewport. On the picture below that is the white square in the total picture of the Mandelbrot set.
In advanced games things can happen that are actually not on the screen, so they must be taken care of for each frame, typically using the elapsed time to update positions and interactions.
But what we also need is a calculation for where on the screen the world parts are displayed – a world to screen transformation, illustrated by the blue arrow on the picture below. At other times, we need to go from the screen to the world, and that transformation can easily be deduced from the first one.
The upper left of the white rectangle must be transformed to the upper left of the pixel area on the screen, the lower right to the lower right, and so on for all the points inbetween. In our Mandelbrot world, the 2 dimensions represents the complex numbers illustrated as x and y real number coordinates in a mathematical plane, where the y axis is vertical and has increasing values going up, and the x axis has rising values going right, and they cross at the coordinate (0.0, 0.0). On the screen, the pixels have integer coordinates, where x increases going right, but y increases going down! And they have the coordinate (0, 0) at the upper left corner. Care must be taken to get this right.
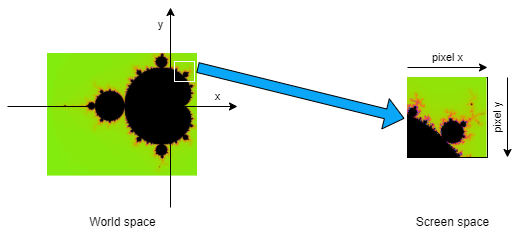
In this implementation, 2 variables are used, an olc::vd2d object worldOffset with the x and y coordinates of the upper left of the viewport in the world system, and a worldScale double which describes the distance in world space between each pixel in screen space. For the y, the worldScale has to be used with a negative sign, as the directions in the two systems are opposites. These can be used to calculate both back and forth between world and screen space using the right formulas.
Here you can see the 2 variables, and how they are set up to display all of the Mandelbrot set. ResetView is called from OnUserCreate() and whenever the user presses the R key.
private:
	olc::vd2d worldOffset;
	double worldScale;

public:
	void ResetView()
	{
		// Setup mapping between pixels and complex number space
		// Make room for the area [-2, 2] to [2,-2]
		worldScale = 4.0 / std::max(ScreenWidth(), ScreenHeight());
		// Make sure (0.0 , 0.0 ) is in the middle of the screen
		worldOffset = {
			-worldScale * ScreenWidth() / 2,
			// Pixel coordinates have increasing Y going down, Mandelbrot world have Y going up
			-(-worldScale * ScreenHeight() / 2)
		};
	}
These variables are changed in OnUserUpdate() with keyboard and mouse input, enabling the user to move around and zoom into the Mandelbrot world as seen in this code:
		if (GetKey(olc::Key::R).bPressed)
		{
			// Reset Screen-to-World transformation
			ResetView();
			maxCount = 256;
		}

		// Move zoom rectangle
		if (GetKey(olc::Key::RIGHT).bPressed)
		{
			worldOffset.x += worldScale * ScreenWidth() * 0.1;
		}
		if (GetKey(olc::Key::LEFT).bPressed)
		{
			worldOffset.x -= worldScale * ScreenWidth() * 0.1;
		}
		if (GetKey(olc::Key::UP).bPressed)
		{
			worldOffset.y += worldScale * ScreenHeight() * 0.1;
		}
		if (GetKey(olc::Key::DOWN).bPressed)
		{
			worldOffset.y -= worldScale * ScreenHeight() * 0.1;
		}

		// Poll mouse clicks, buttons are LEFT, MIDDLE, RIGHT: 1, 2, 3
		// Can also be checked for being held or released
		if (GetMouse(olc::Mouse::LEFT).bPressed)
		{
			// Get mouse position and move the center of the rectangle there
			olc::vi2d mouse = GetMousePos();
			double x = worldOffset.x + mouse.x * worldScale - ScreenWidth()/2 * worldScale;
			double y = worldOffset.y - mouse.y * worldScale + ScreenHeight()/2 * worldScale;

			worldOffset = { x,y };
		}

		// Poll mouse wheel
		// If scrolling, zoom around the mouse position
		int32_t scroll = GetMouseWheel();
		if (scroll != 0)
		{
			olc::vi2d mouse = GetMousePos();
			double oldScale = worldScale;

			if (scroll > 0)
			{
				// Zoom in
				worldScale *= 0.9;
			}
			else
			{
				// Zoom out
				worldScale *= (1.0 / 0.9); // To make zoom in and out reversible
			}

			// Adjust offset to zoom around mouse
			double x = worldOffset.x + mouse.x * oldScale - mouse.x * worldScale;
			double y = worldOffset.y - mouse.y * oldScale + mouse.y * worldScale;

			worldOffset = { x,y };
		}
There are no temporal changes of the Mandelbrot set, it exists statically in the x-y plane. However, it has infinite details so it doesn’t make sense to calculate it all. The calculations are also dependent on the resolution in screen pixels when zooming in and out and moving around. Therefore for each pixel, a point in the Mandelbrot world is calculated. This could be restricted to be done only when zoom and position are changed, saving the results, but to demonstrate the speed of modern computers, it is done for every frame.
First, some variables for the world coordinates are calculated, so the screen-to-world transformation doesn’t have to be calculated for every pixel. Instead step values for x and y are used, when going to the next pixel to the right or down:
		// Current area for calculation must be calculated
		olc::vd2d worldTopLeft = worldOffset;

		double xStep = worldScale;
		double yStep = -worldScale;
Then the Mandelbrot count values are calculated and a suitable color selected for each pixel, line by line of pixels on the screen:
		double worldY = worldTopLeft.y;
		for (int y = 0; y < ScreenHeight(); y++)
		{
			double worldX = worldTopLeft.x;
			for (int x = 0; x < ScreenWidth(); x++)
			{
				int count = MandelbrotCount(worldX, worldY);
				olc::Pixel currPix;
				if (count >= maxCount)
					currPix = olc::BLACK;
				else
				{
					float angle = 2 * pi * count / maxCount;
					// Palette based on @Eriksonn's calculation, see my post and OneLoneCoder Discord channel
					currPix = olc::PixelF(0.5f * sin(angle) + 0.5f, 0.5f * sin(angle + 2*pithird) + 0.5f, 0.5f * sin(angle + 4 * pithird) + 0.5f);
				}

				Draw(x, y, currPix);
				worldX += xStep;
			}
			worldY += yStep;
		}
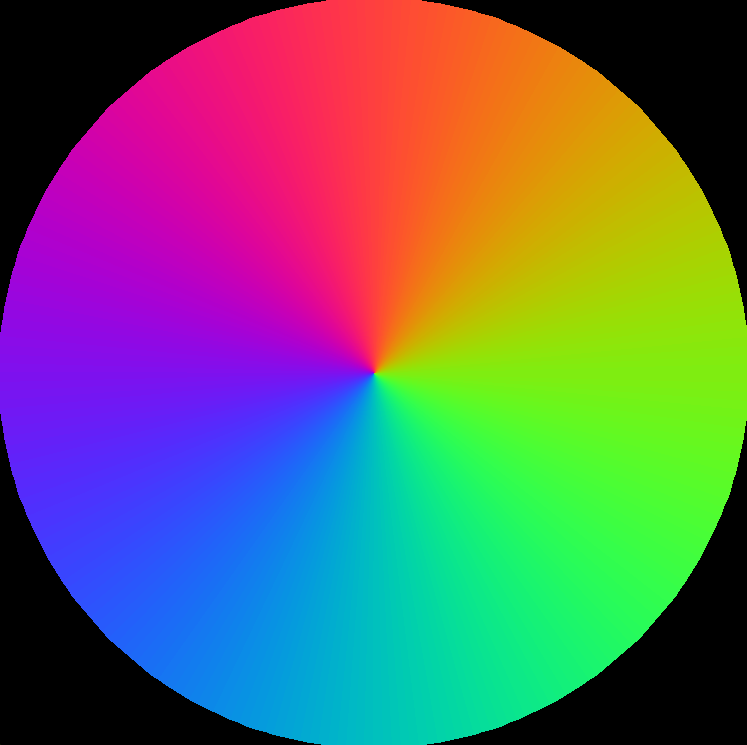
The color assignment in line 15 is based on Eriksonn’s scheme for coloring fractals. Eriksonn is a member of the community around OneLoneCoder’s programming activities on YouTube and Discord, see links at the end of the post. This palette will give you a different interesting color for every count and is a very good solution when you don’t want to emphasize underlying features of the fractal. It gives a palette like this:
The Mandelbrot count is calculated by the well known optimization of the calculation, which doesn’t do the calculations in the complex number realm, but looks at what happens with x and y separately when mapping the real part of the complex number to x and the imaginary part to y. The maxCount in this application is fixed at 256 to make comparisons to my old experiences.
	int MandelbrotCount(double x, double y)
	{
		double zx = x;
		double zy = y;
		double zx2 = zx * zx;
		double zy2 = zy * zy;

		int count = 0;

		while (count < maxCount && zx2 + zy2 <= 4.0)
		{
			zy = zy * zx * 2 + y;
			zx = zx2 - zy2 + x;
			zx2 = zx * zx;
			zy2 = zy * zy;

			count++;
		}

		return count;
	}
Putting all this together, starting the application looks like this:
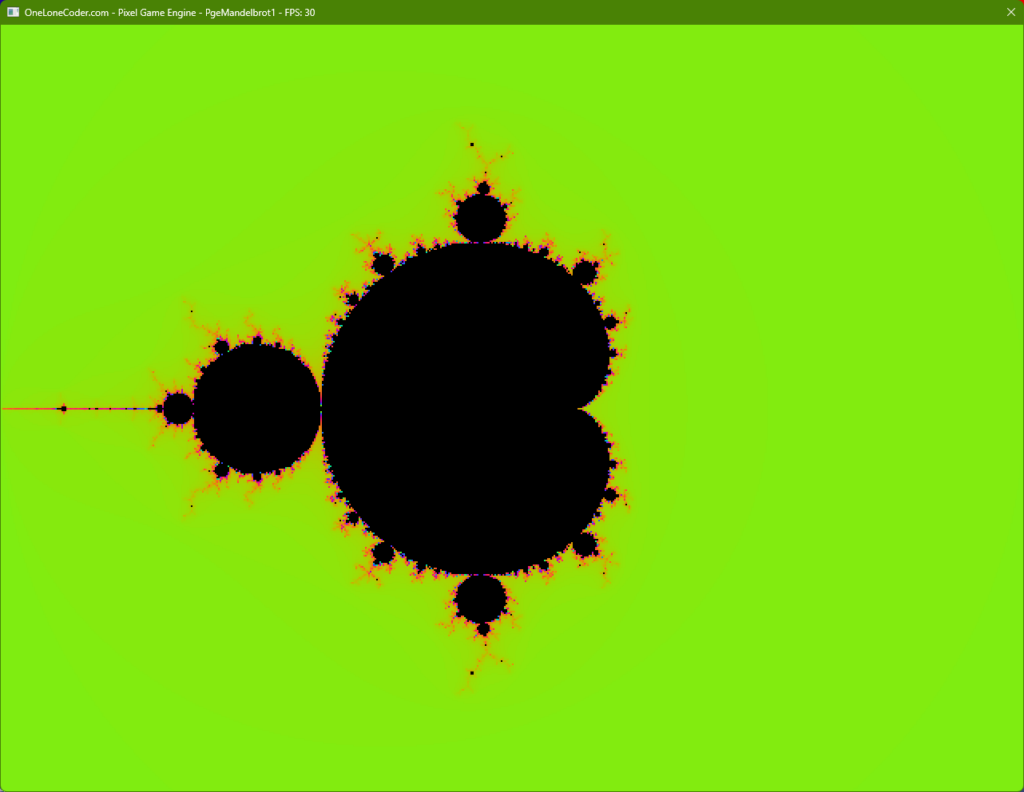
Looking at the main function:
	PgeMandelbrot1 demo;

	if (demo.Construct(640, 480, 2, 2, false, false, false, false))
		demo.Start();
it can be seen that the pixel space is 640 x 480 to compare it to what was possible on an old PC. Each pixel is then represented by 2 x 2 pixels on the modern screen.
It is a built-in feature of PGE that it shows the frame rate in the Windows title. You can see the FPS value is 30. That means that a 640×480 picture of the Mandelbrot set, using the maxCount of 256, can be calculated (not just shown) 30 times every second! That used to take several minutes, when I started my Mandelbrot journey in the 1980’s! That was a moment of serendipity – but it took some time to get there 🙂
Where did C++ take us this time?
I refound my joy in being able to make interesting bitmap/pixel based program with OneLoneCoder’s install-free graphics package, the Pixel Game Engine (more below in the code section). I look forward to a lot of programming for fun, in fact one of the reasons this post has been so long underway is that I have been busy using it for investigations – especially on parallel programming. More about that next time.
I found out that modern computers gives you so much power that you don’t have to worry about every pixel on your program’s sceen all the time, so I haven’t actually solved the problem of handling user input and doing long calculations at the same time, because it wasn’t necessary. I am sure I can find problems where this becomes necessary, but so far the ceiling has been raised so I don’t butt my head against it. Perhaps material for a later post.
Did I escape OpenGL? Yes and no! At the bottom, PGE is mostly based on OpenGL but it takes care of making it work on many different platforms, see below. But I don’t need to know anything about it, I can just dive into clean programming fun you can depend on!
About the code
As usual the code can be found on the github site of this blog. Currently it is organized as a Visual Studio 2022 solution with one project C++ project PgeMandelbrot1. I plan to let the code for the next post be another project under the same solution.
I added a clang-llvm compiler suite configuration into that VS solution, and installed the clang tools for VS. My PGE application compiled and linked without any problems, and it runs just as fast as the MSVC Release configuration, about 30 frames per second – FPS.
But to prove the portability of my code and PGE, I have also included build scripts for MinGW64 on Windows, and for gcc and clang on Linux. They are in the PgeMandelbrot1 project folder as .sh files.
MinGW64 is gcc based, so success with that build proved that it is gcc compliant, and the speed was the same.
The two linux build scripts I ran on Q4OS Linux, which is Debian based, and I followed the instructions here using the Ubuntu recipe for PGE based applications. They both worked equally well, but that PC is a slower PC and didn’t give quite as good results, about 18 FPS, the clang version a bit faster. (Eventually I will post a list of my computers on this site).
This application is quite primitive, and a lot of things could be added so it would be at least as flexible as my original inspiration from OneLoneCoder. Zooming and panning could be improved, and parameters for the Mandelbrot calculations and the coloring.
One of the good things about the PGE is the community that has arisen around it, and some members have made extensions to the basic PGE that can support or facilitate more functions. One of them is actually setting up a world-to-screen mapping as I described above, and at the same time adding support for zooming and panning. It is very easy to plug into your application. This mapping can be difficult to get right, so that particular extension is a great help. More about this in the next post, where the application will be a bit more complete.
Who is OneLoneCoder actually? His account name on YouTube is javidx9 (he uses the same handle on several other social media,) and he describes a bit about himself on this site. That site however is fairly quiet and it doesn’t reveal that in real job life his name is David Barr, with another site here. He has been running the OneLoneCoder channel on YouTube for at least 7 years and has covered a lot an enormous amount of different topics, I even pointed my students to his video about pointers in C++. It’s all about that programming is fun!
A lot of the community activities takes place on Discord in this channel:
https://discordapp.com/channels/380484403458998276/486237126308921344
I want to give credit to @eriksonn, whom javidx9 mentions in his code for Mandelbrot exploration, for his smart coloring scheme, shown in the code above. The red, green, and blue (RGB) components of the color of a pixel are generated using the same sine function, but with a phase shift for each of them, so at least one of the 3 colors will always have a value not equal to zero for any count you give as an input. That means there aren’t any boring colors as black, white or grey, which makes it easy get a nice picture of your iterative function fractal, like the Mandelbrot Set. I contacted javidx9 on Discord, and I actually made contact with @eriksonn, he is active there now and then, try a channel search. But he seems a bit shy and humble about his contributions, so I haven’t found out more about him and his other works in fractal programming, if you have information, please bring it to me.
The PGE doesn’t only live on Windows and Linux. It can be built for MacOS, for mobile platforms like iOS and Android, and it can be compiled into a web-assembly using the Emscripten toolchain, allowing it to run on any platform that has a browser that supports web-assemblies. Some people have also worked on making it run on RaspberryPis, via Linux.
The Emscripten port is the basis of the web-site https://pgetinker.com/ where you can play with PGE directly in your browser
It is a bit hard to find documentation on all the features in PGE and in the extensions. The best source is javidx9’s YouTube channel and the Discord channel.
And if you need to program an application that demands really heavy graphics, I am afraid you have to learn to use a software platform that is closer to the hardware. But until then – PGE offers plenty of fun, especially on reasonably modern hardware. The above mentioned Linux PC is from 2013 and now runs Linux instead of Windows and does a fine job.
Leave a Reply